
2 Click the Select tool in the toolbar and click the vertical side of the cylinder to select it.
3 Your cylinder is ready to be painted. Click the SymmetryMill Texture Editor window to bring it up front or choose Plugins > SymmetryMill to open the window.
4 Make an edit in SymmetryMill to apply the current pattern to the cylinder. You might also make use of SymmetryMill's built-in color filters and pick more vivid colors.

Because SymmetryMill assigns exactly the same texture to each selected face within a surface, you will notice that the cylinder is painted in vertical stripes, revealing the structure of the surface (as if we had chosen to show hidden geometry, which we did not). In fact, you may want to make sure that the View > Hidden Geometry menu item is not checked, it will be important in the next step.
5 We will now make the texture wrap around the cylinder:

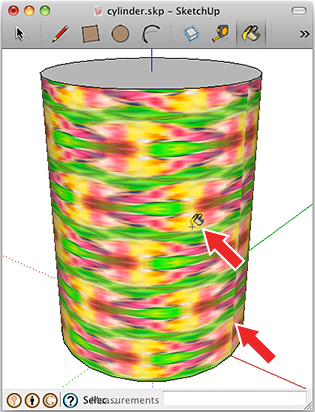
6 However, there is still an imperfection in the wrapping. In our case, it appears on the right side of the cylinder, but it might also be elsewhere and you may need to go around the cylinder to find it: click the Orbit tool in the toolbar, then click and drag the cursor horizontally until the imperfection is clearly visible (or you can rotate the cylinder instead).

The reason for the imperfection is obvious. Just imagine that you have a repeating pattern printed on a properly sized piece of paper and you wrap your paper around the cylinder. Generally, there will be a visible junction where the ends of the paper meet, unless you have taken care to choose the repeat size of your pattern so that it will wrap around exactly the right number of times.
And this is what we will do now. The length of the circumference of a circle with the radius R = 10" is 2πR = 62.8319". Say, we want the pattern to repeat around the cylinder N = 6 times. Then the width of the pattern tile must be about 2πR / N ≈ 10.472". (Given that SketchUp approximates a cylinder with flat segments, the actual width may be a little smaller, but in many cases this estimate will suffice.)
7 Now find your SymmetryMill Tile material in the Window > Materials panel (see "Accessing Your SymmetryMill Patterns" in the basic SymmetryMill texture tutorial for details). Then double-click the SymmetryMill material to edit it, enter 10.472" in the Width field, and press Enter. The abrupt juncture disappears. Click the Close button to finish with the edit. You can download the painted cylinder as a SketchUp file and experiment further.

 After you press the Enter key, SketchUp may display an approximate (rounded) number instead of the exact value of the width and height that you enter. If you want to change the display precision, choose Window > Model Info, click Units in the left pane, and choose a different value in the Precision popup.
If you enabled "length snapping" in the Model Info dialog, and chose a relatively large value of snapping, you must click the Close button immediately after you enter the width of your texture—or, depending on what you do next, SketchUp may round the entered value to the nearest "snapped" value and then the joint may reappear.

For finer control, you can employ all the texture positioning tools available in SketchUp. There are a great many tutorials on the web and they are very helpful for applying SymmetryMill textures too. The only difference that you want to keep in mind is that other tutorials usually use imported photo-textures, whereas SymmetryMill automatically creates seamless repeating textures for you.
1 Load the Citizen Extras_Female 03 model from 3D Warehouse (or a similar model you like).

2 Prepare an auxiliary flat surface inside the model component:
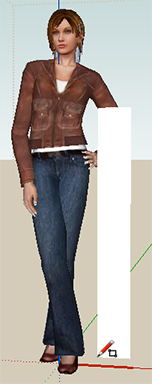

3 If you apply the same texture to the pants, the texture will look jagged. We avoid the jagged look by making the texture projected and then apply the projected texture to the pants. Right-click the rectangle and choose Texture > Projected from the context menu.

4 Then sample the projected texture and apply it to the pants:


Note that you need to do the projected texture trick only once per surface. SymmetryMill will remember your choice and project the texture automatically after each SymmetryMill edit.
Feel free to download the model with our texture applied. Remember that by clicking any surface painted with a SymmetryMill pattern, you can always restore the SymmetryMill settings used to create that pattern. So you can take it from there and experiment further.


